> ## Documentation Index
> Fetch the complete documentation index at: https://help.hivra.app/llms.txt
> Use this file to discover all available pages before exploring further.
# Editing Video and Images in the Composer
> Crop, rotate, adjust colors, add text overlays, trim and cut video, mute audio, and generate auto captions right inside the Composer before you publish.
The media editor is a built-in editing tool in the Composer that lets you touch up your video or image before you publish — without leaving Hivra or opening a separate app. You can crop and reframe for a platform's aspect ratio, adjust colors, add text overlays, trim or cut a video down to size, mute or boost the audio, and generate word-by-word captions, all from the same screen where you upload and caption your post.
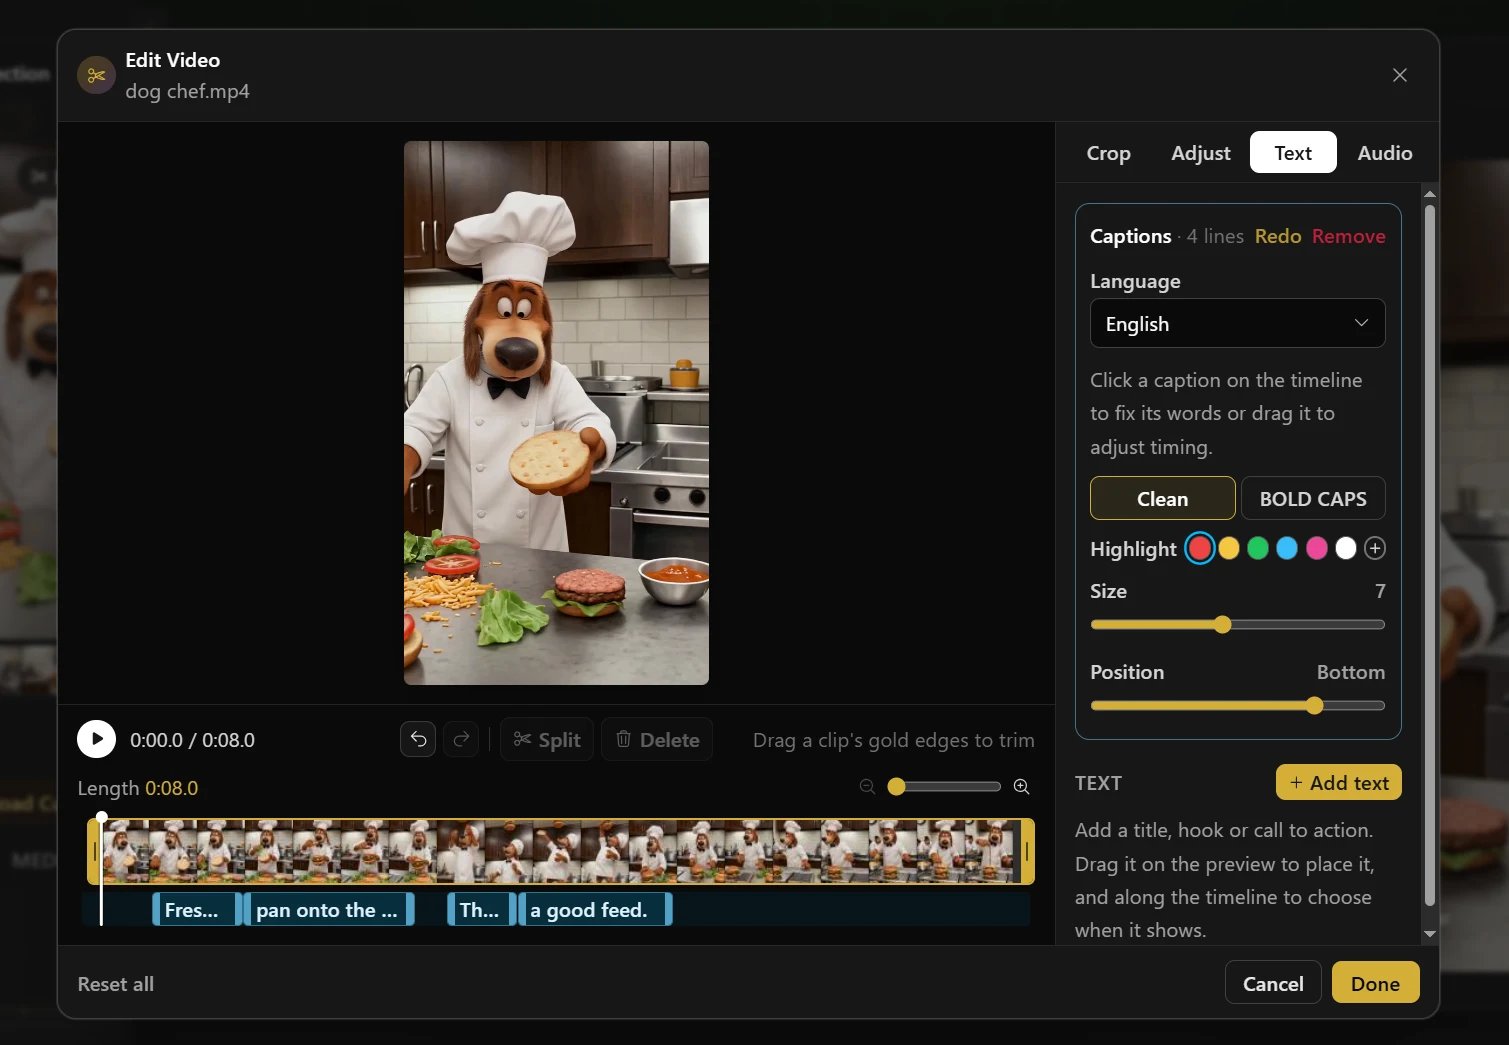 Everything runs in your browser, on your own device. Nothing is uploaded until you click **Done** — at that point Hivra renders your edit and the result replaces the file you uploaded for that post.
## Opening the editor
Drag a video or image into the Composer, or select a file you already uploaded from the thumbnail rail or media queue.
Hover over the selected file's preview above the thumbnail rail. A pill labeled **Edit Video** (for video files) or **Edit Image** (for image files) appears pinned to the top of the frame.
Click **Edit Video** or **Edit Image** to open the media editor. It opens as a full-screen tool with your media on the left and editing tools on the right.
In a bulk upload session, the editor only ever affects the file that's currently active in the media queue — editing one clip's colors, crop, or text has no effect on the others. See [Per-file Composer context](/publishing/per-file-composer-context) for how each file keeps its own settings.
## The editing tools
The right-hand panel has tabs for each kind of edit. Images get **Crop**, **Adjust**, and **Text**. Videos get those three plus **Audio**.
### Crop, rotate, and flip
Under the **Crop** tab:
* **Aspect ratio** — choose a preset to reframe your media: **Original**, **Free** (drag to any shape), **9:16** (TikTok, Reels, Shorts), **1:1** (square feed), **4:5** (Instagram portrait), **16:9** (YouTube, X), or **1.91:1** (Instagram landscape). Drag the crop box on the preview to reposition it within the chosen shape.
* **Rotate & flip** — click **Left** or **Right** to rotate in 90 degree steps, or toggle the two **Flip** buttons to mirror the frame horizontally or vertically.
* **Straighten** (images only) — fine-tune the angle with a slider from -45 to +45 degrees. The image zooms in slightly so no empty corners show.
On the Free plan, the Crop tab shows a note that edits carry a small Hivra watermark, with a link to upgrade. See [Limits and plans](#limits-and-plans) below.
### Color adjustments and filters
Under the **Adjust** tab:
* **Filters** — one-click presets: **Original**, **Vivid**, **Warm**, **Cool**, **Mono**, **Fade**, and **Drama**.
* **Adjust** — manual sliders for **Brightness**, **Contrast**, **Saturation**, and **Warmth**, each from -100 to 100. Double-click a slider to reset just that one value.
Filters and manual sliders stack — picking a filter and then nudging a slider adjusts on top of the filter.
### Adding text overlays
Under the **Text** tab, click **Add text** to drop a new text box onto your media (up to 10 per file, 280 characters each). Select any text in the list to edit it:
* **Content** — type your text, and use the **Emoji** button to insert an emoji at the cursor.
* **Font** — Sans, Serif, Mono, or Display.
* **Style** — Plain, Shadow, Outline, or Box (with its own box color).
* **Color** — pick a swatch or choose a custom color.
* **Size** and **Rotation** — sliders to scale and tilt the text.
* **Enter** / **Exit** (video only) — how the text animates in and out: None, Fade, Pop, Slide up, Slide in, Zoom, or Typewriter for entering; None, Fade, Slide down, Slide out, or Zoom for exiting.
Drag a text box directly on the preview to reposition it. On video, you can also drag its bar on the timeline to choose exactly when it appears and disappears. Click **Delete text** to remove the selected overlay.
### Trimming and cutting a video
Below the video preview, the timeline shows your clip as one or more connected parts:
* **Trim** — drag the gold handle at either edge of a part inward or outward to shorten or extend it.
* **Cut** — move the playhead to where you want to cut and click **Split** (or press the `S` key) to divide the clip into two parts there.
* **Remove a part** — select a part on the timeline and click **Delete** (or press `Delete` or `Backspace`) to drop it; the remaining parts play back to back.
* **Reset cuts** — click this link to restore the full, untrimmed clip.
Press the spacebar to play or pause the preview, and use `Ctrl`+`Z` (or `Cmd`+`Z` on a Mac) to undo and redo any change you've made in the session.
### Auto-generated captions
Still under the **Text** tab, the **Auto captions** card turns your video's spoken audio into word-by-word captions:
Leave **Language** set to **Detect automatically**, or pick a specific spoken language from the dropdown.
Hivra downloads a speech model to your browser the first time you use this (later runs reuse it), then transcribes the clip's audio on your device.
If you left language on automatic, Hivra asks you to confirm the language it detected from the sound of the speech — accept the guess, or choose the correct one yourself. Your answer is remembered for next time.
Captions appear on the timeline and over the video. Click a caption to edit its wording, drag it to retime it, or drag it on the preview to reposition where it sits on screen.
Once captions exist, you can also set a **Font** (Clean or bold capitals), a **Highlight** color for the word currently being spoken, and sliders for **Size** and **Position** (Top, Middle, or Bottom). Use **Redo** to regenerate, or **Remove** to delete all captions.
Auto captions only work on a clip that has an audio track. Changing the language after captions already exist regenerates them in the new language.
### Audio controls
Under the **Audio** tab (video only):
* **Remove sound** — mutes the clip entirely.
* **Volume** — a slider from 0% to 200% when sound isn't removed. Boosting past 100% is applied when you click **Done**; the live preview still plays at normal volume.
## Saving your edit
When you're happy with your changes, click **Done**. Hivra renders the edit on your device and shows a progress bar while it works — for video, this can take a little while depending on the clip's length and your device, so keep the tab open until it finishes. You can click **Cancel** during a render to stop it.
Once the render finishes, the edited file replaces the original upload for that post. If you close the editor without saving, click **Cancel** — if you made any changes, Hivra asks you to confirm before discarding them. **Reset all** clears every change made in the current editing session without closing the editor.
Saving an edit replaces the file used for that post. The original upload is not published — only the edited version is sent when you publish or schedule.
## Limits and plans
| Limit | Detail |
| - | - |
| Where it runs | Entirely in your browser, on your device — no part of the edit is processed on Hivra's servers |
| Browser support | Needs a recent Chrome, Edge, Safari, or Firefox with video encoding support; **Edit Video** is disabled with an explanation if your browser can't support it |
| Max video length | Videos longer than 10 minutes can't be edited in the browser |
| Text overlays | Up to 10 per file, 280 characters each |
| Exported video | Up to 1080p, H.264 video with AAC audio |
| Exported image | Up to 4096px on the long side; PNGs stay PNG, everything else exports as JPEG |
On the **Free** plan, every edited video or image carries a small Hivra watermark. Upgrading to **Creator** or **Business** removes it — see [Plans and pricing](/account/plans).
## Troubleshooting
Your browser may not support the video encoding the editor relies on. Try a recent version of Chrome, Edge, Safari, or Firefox. Editing images does not have this requirement.
The browser-based editor caps source videos at 10 minutes. Trim the file with another tool first, or publish it unedited.
Rendering happens on your own device and can take longer on an older computer or a long, high-resolution clip. Keep the tab open and in the foreground until it finishes — avoid switching to other heavy tabs while a render is in progress. If it truly stalls, click **Cancel** and try **Done** again.
Decline the detected language when Hivra asks, or open the **Language** dropdown afterward and pick the correct language — captions regenerate automatically.
Auto captions need an audio track to transcribe. If your clip has no sound, the button stays disabled with a note explaining why.
Watermarking applies to every edit made on the **Free** plan. Upgrade to **Creator** or **Business** to remove it from new edits — see [Plans and pricing](/account/plans).
## Related
The full Composer walkthrough, including where thumbnails and media fit in.
How each file in a bulk session keeps its own caption, settings, and now edits.
Upload and edit several clips in one Composer session.
Compare Free, Creator, and Business, including the media editor watermark.
This documentation is built and hosted on [Mintlify](https://mintlify.com), a developer documentation platform.
Everything runs in your browser, on your own device. Nothing is uploaded until you click **Done** — at that point Hivra renders your edit and the result replaces the file you uploaded for that post.
## Opening the editor
Drag a video or image into the Composer, or select a file you already uploaded from the thumbnail rail or media queue.
Hover over the selected file's preview above the thumbnail rail. A pill labeled **Edit Video** (for video files) or **Edit Image** (for image files) appears pinned to the top of the frame.
Click **Edit Video** or **Edit Image** to open the media editor. It opens as a full-screen tool with your media on the left and editing tools on the right.
In a bulk upload session, the editor only ever affects the file that's currently active in the media queue — editing one clip's colors, crop, or text has no effect on the others. See [Per-file Composer context](/publishing/per-file-composer-context) for how each file keeps its own settings.
## The editing tools
The right-hand panel has tabs for each kind of edit. Images get **Crop**, **Adjust**, and **Text**. Videos get those three plus **Audio**.
### Crop, rotate, and flip
Under the **Crop** tab:
* **Aspect ratio** — choose a preset to reframe your media: **Original**, **Free** (drag to any shape), **9:16** (TikTok, Reels, Shorts), **1:1** (square feed), **4:5** (Instagram portrait), **16:9** (YouTube, X), or **1.91:1** (Instagram landscape). Drag the crop box on the preview to reposition it within the chosen shape.
* **Rotate & flip** — click **Left** or **Right** to rotate in 90 degree steps, or toggle the two **Flip** buttons to mirror the frame horizontally or vertically.
* **Straighten** (images only) — fine-tune the angle with a slider from -45 to +45 degrees. The image zooms in slightly so no empty corners show.
On the Free plan, the Crop tab shows a note that edits carry a small Hivra watermark, with a link to upgrade. See [Limits and plans](#limits-and-plans) below.
### Color adjustments and filters
Under the **Adjust** tab:
* **Filters** — one-click presets: **Original**, **Vivid**, **Warm**, **Cool**, **Mono**, **Fade**, and **Drama**.
* **Adjust** — manual sliders for **Brightness**, **Contrast**, **Saturation**, and **Warmth**, each from -100 to 100. Double-click a slider to reset just that one value.
Filters and manual sliders stack — picking a filter and then nudging a slider adjusts on top of the filter.
### Adding text overlays
Under the **Text** tab, click **Add text** to drop a new text box onto your media (up to 10 per file, 280 characters each). Select any text in the list to edit it:
* **Content** — type your text, and use the **Emoji** button to insert an emoji at the cursor.
* **Font** — Sans, Serif, Mono, or Display.
* **Style** — Plain, Shadow, Outline, or Box (with its own box color).
* **Color** — pick a swatch or choose a custom color.
* **Size** and **Rotation** — sliders to scale and tilt the text.
* **Enter** / **Exit** (video only) — how the text animates in and out: None, Fade, Pop, Slide up, Slide in, Zoom, or Typewriter for entering; None, Fade, Slide down, Slide out, or Zoom for exiting.
Drag a text box directly on the preview to reposition it. On video, you can also drag its bar on the timeline to choose exactly when it appears and disappears. Click **Delete text** to remove the selected overlay.
### Trimming and cutting a video
Below the video preview, the timeline shows your clip as one or more connected parts:
* **Trim** — drag the gold handle at either edge of a part inward or outward to shorten or extend it.
* **Cut** — move the playhead to where you want to cut and click **Split** (or press the `S` key) to divide the clip into two parts there.
* **Remove a part** — select a part on the timeline and click **Delete** (or press `Delete` or `Backspace`) to drop it; the remaining parts play back to back.
* **Reset cuts** — click this link to restore the full, untrimmed clip.
Press the spacebar to play or pause the preview, and use `Ctrl`+`Z` (or `Cmd`+`Z` on a Mac) to undo and redo any change you've made in the session.
### Auto-generated captions
Still under the **Text** tab, the **Auto captions** card turns your video's spoken audio into word-by-word captions:
Leave **Language** set to **Detect automatically**, or pick a specific spoken language from the dropdown.
Hivra downloads a speech model to your browser the first time you use this (later runs reuse it), then transcribes the clip's audio on your device.
If you left language on automatic, Hivra asks you to confirm the language it detected from the sound of the speech — accept the guess, or choose the correct one yourself. Your answer is remembered for next time.
Captions appear on the timeline and over the video. Click a caption to edit its wording, drag it to retime it, or drag it on the preview to reposition where it sits on screen.
Once captions exist, you can also set a **Font** (Clean or bold capitals), a **Highlight** color for the word currently being spoken, and sliders for **Size** and **Position** (Top, Middle, or Bottom). Use **Redo** to regenerate, or **Remove** to delete all captions.
Auto captions only work on a clip that has an audio track. Changing the language after captions already exist regenerates them in the new language.
### Audio controls
Under the **Audio** tab (video only):
* **Remove sound** — mutes the clip entirely.
* **Volume** — a slider from 0% to 200% when sound isn't removed. Boosting past 100% is applied when you click **Done**; the live preview still plays at normal volume.
## Saving your edit
When you're happy with your changes, click **Done**. Hivra renders the edit on your device and shows a progress bar while it works — for video, this can take a little while depending on the clip's length and your device, so keep the tab open until it finishes. You can click **Cancel** during a render to stop it.
Once the render finishes, the edited file replaces the original upload for that post. If you close the editor without saving, click **Cancel** — if you made any changes, Hivra asks you to confirm before discarding them. **Reset all** clears every change made in the current editing session without closing the editor.
Saving an edit replaces the file used for that post. The original upload is not published — only the edited version is sent when you publish or schedule.
## Limits and plans
| Limit | Detail |
| - | - |
| Where it runs | Entirely in your browser, on your device — no part of the edit is processed on Hivra's servers |
| Browser support | Needs a recent Chrome, Edge, Safari, or Firefox with video encoding support; **Edit Video** is disabled with an explanation if your browser can't support it |
| Max video length | Videos longer than 10 minutes can't be edited in the browser |
| Text overlays | Up to 10 per file, 280 characters each |
| Exported video | Up to 1080p, H.264 video with AAC audio |
| Exported image | Up to 4096px on the long side; PNGs stay PNG, everything else exports as JPEG |
On the **Free** plan, every edited video or image carries a small Hivra watermark. Upgrading to **Creator** or **Business** removes it — see [Plans and pricing](/account/plans).
## Troubleshooting
Your browser may not support the video encoding the editor relies on. Try a recent version of Chrome, Edge, Safari, or Firefox. Editing images does not have this requirement.
The browser-based editor caps source videos at 10 minutes. Trim the file with another tool first, or publish it unedited.
Rendering happens on your own device and can take longer on an older computer or a long, high-resolution clip. Keep the tab open and in the foreground until it finishes — avoid switching to other heavy tabs while a render is in progress. If it truly stalls, click **Cancel** and try **Done** again.
Decline the detected language when Hivra asks, or open the **Language** dropdown afterward and pick the correct language — captions regenerate automatically.
Auto captions need an audio track to transcribe. If your clip has no sound, the button stays disabled with a note explaining why.
Watermarking applies to every edit made on the **Free** plan. Upgrade to **Creator** or **Business** to remove it from new edits — see [Plans and pricing](/account/plans).
## Related
The full Composer walkthrough, including where thumbnails and media fit in.
How each file in a bulk session keeps its own caption, settings, and now edits.
Upload and edit several clips in one Composer session.
Compare Free, Creator, and Business, including the media editor watermark.
This documentation is built and hosted on [Mintlify](https://mintlify.com), a developer documentation platform.